사이먼's 코딩노트
[SpringBoot] 결제 시스템 본문
[TossPayments 결제 시스템 구현]
- 이번 포스팅에서는 마켓 전용 프로젝트를 기반으로 토스 페이먼츠 결제 시스템을 구현해 볼 예정입니다.
- 마켓 프로젝트의 전체 코드를 포스팅할 수 없기 때문에 전체 구조와 코드를 확인하시려면 리포지터리 주소를 참고 부탁드립니다.
- 해당 프로젝트는 SpringBoot v_3.3.0, Java 21 기반으로 세팅되어 있습니다.
- 리포지터리 URL 주소 : https://github.com/psm817/cod_market
GitHub - psm817/cod_market
Contribute to psm817/cod_market development by creating an account on GitHub.
github.com
[토스페이먼츠 가입]
- 결제 시스템을 토스페이먼츠를 통해 구현하기 위해서는 먼저, 토스페이먼츠에 가입한 후 로그인을 해야한다.
- 로그인 후 우측 상단의 개발자센터 메뉴를 통해 개발자센터 페이지로 진입한다.

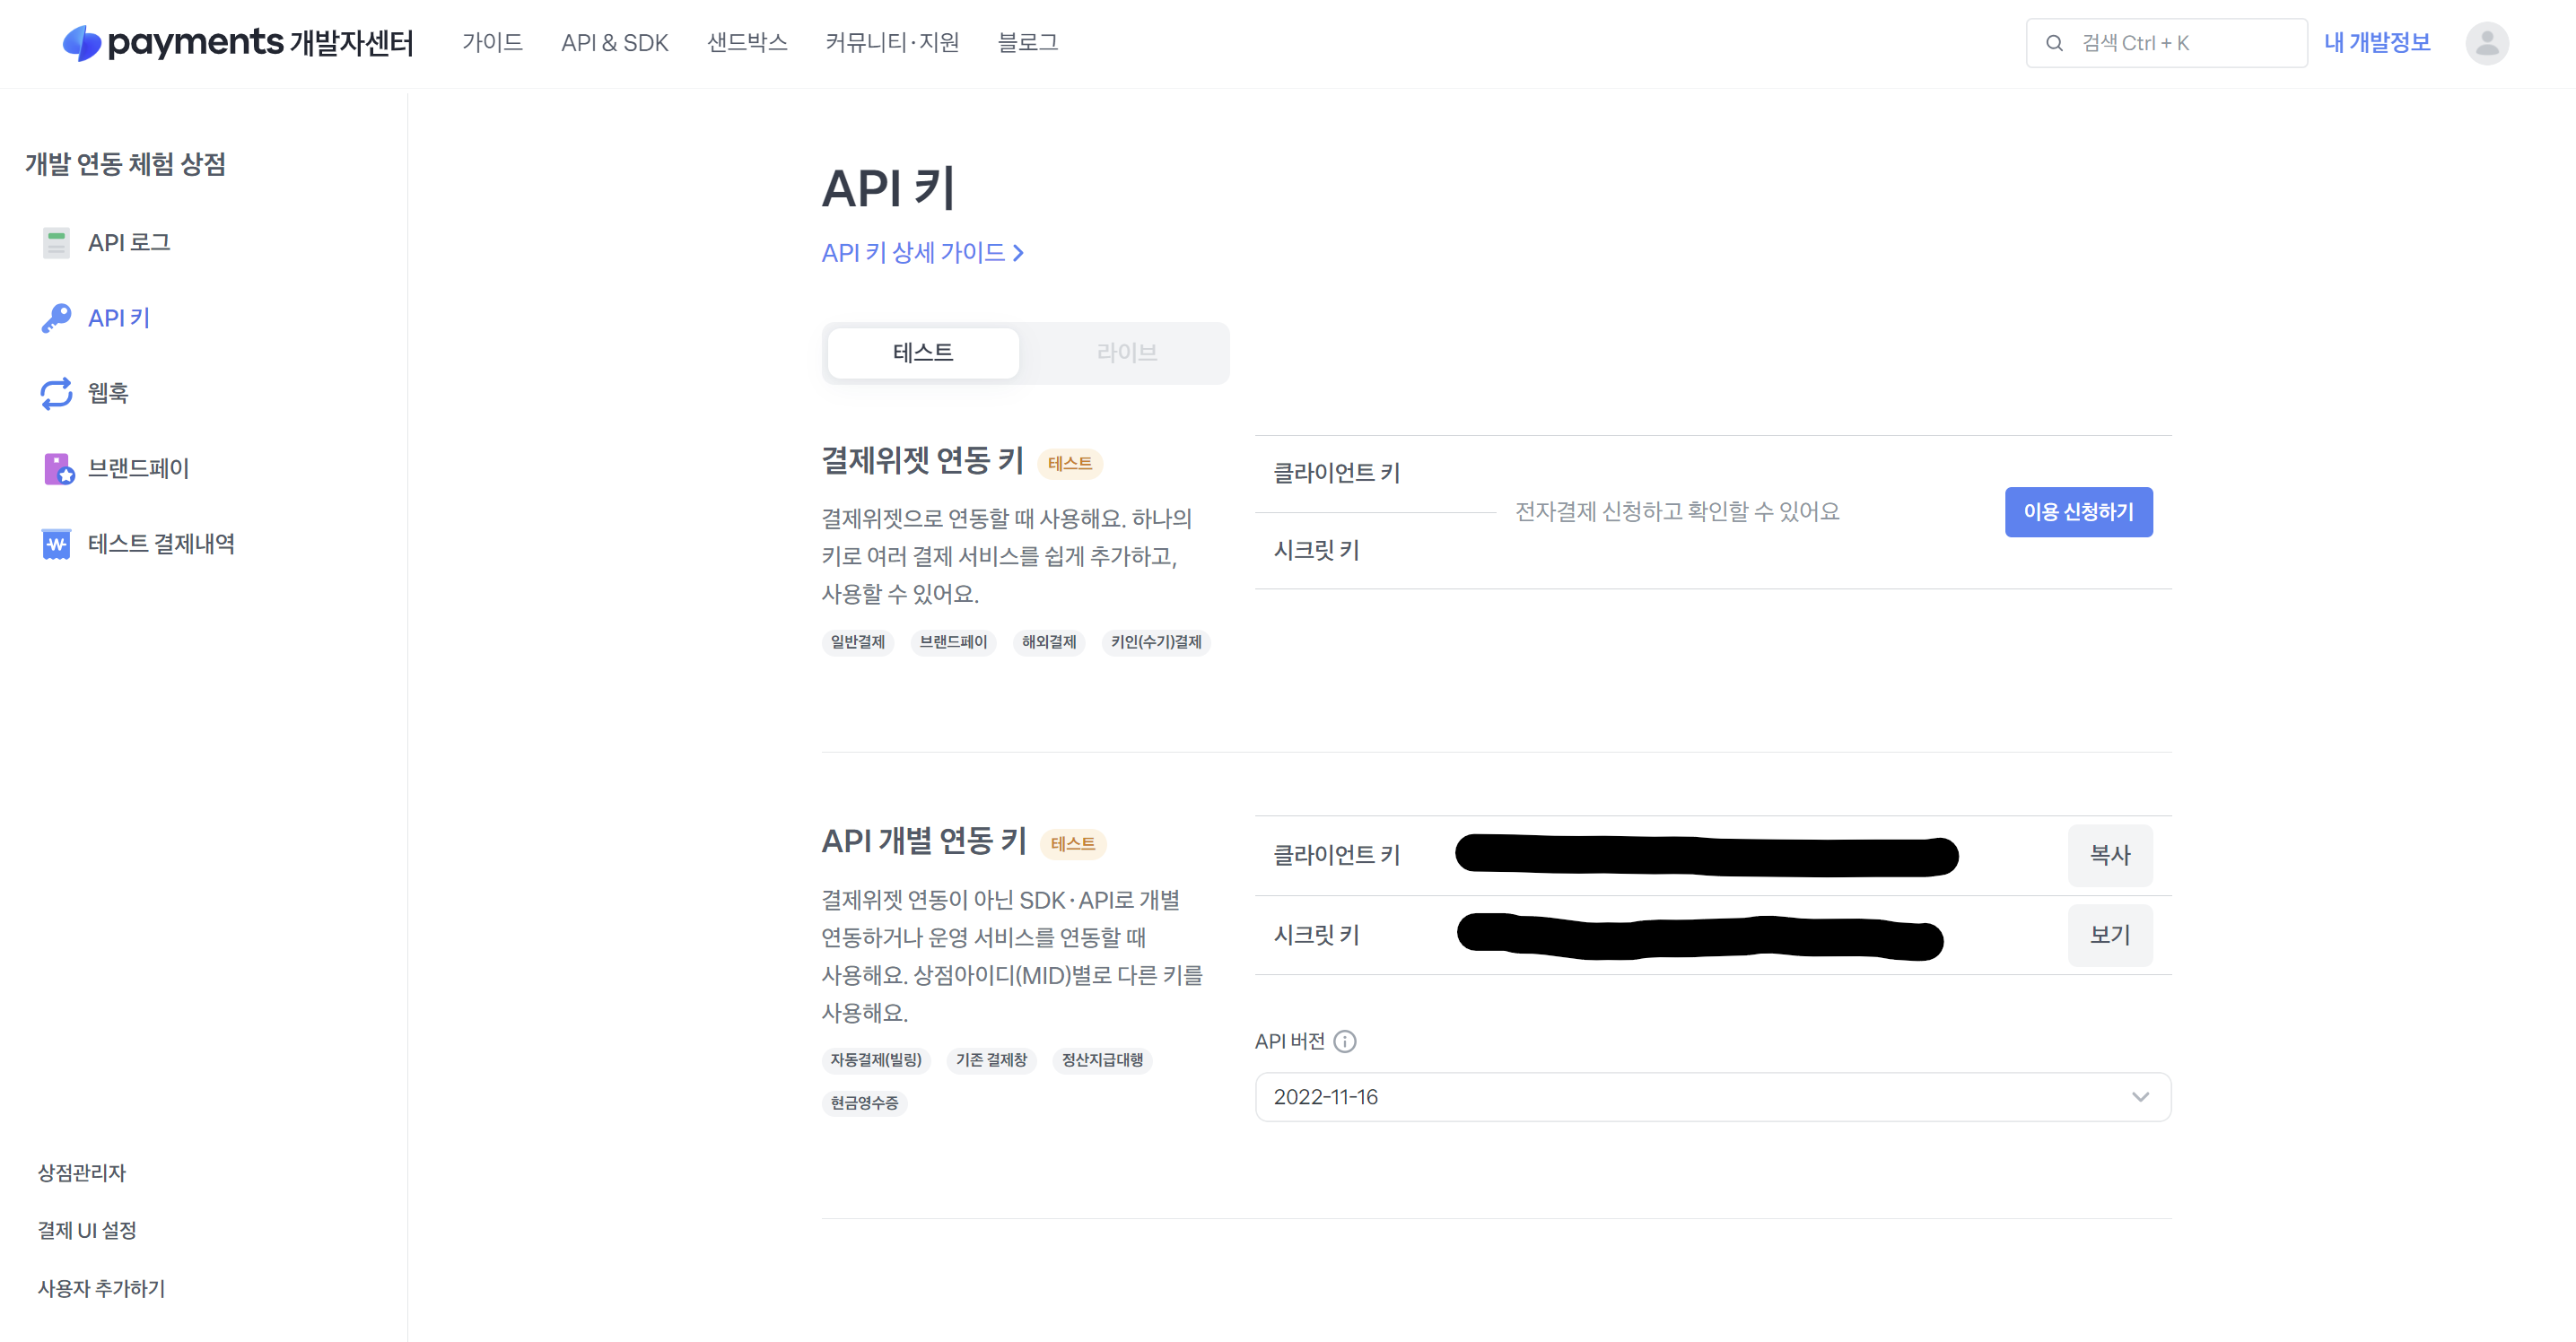
- 개발자센터 페이지에서 우측 상단의 내 개발정보 메뉴를 통해 API 키를 확인할 수 있다.

[샘플코드 가져오기]
- 토스페이먼츠에서 제공하는 결제 연동 코드 샘플을 가져와서 결제에 필요한 템플릿에 해당 코드를 적용하고 상황에 맞춰 코드를 수정해야한다.
- 아래 코드는 마켓 프로젝트 안의 상품 상세정보 페이지에서 버튼을 통해 결제가 가능하도록 order/detail.html에 작성된 코드이다.
- HTML에서 사용한 타임리프 문법을 JavaScript에서 사용하려면 /*[[${product.price}]]*/ 와 같은 형식으로 사용해야한다.
- Script를 보면 tossPayments 변수에 테스트 클라이언트 키를 넣어야 하는데, 이 키는 토스페이먼트 홈페이지에서 확인한 클라이언트 키를 넣어주면 된다.
- 코드 마지막에는 결제를 하지 않고 결제창을 나갔을 때 결제가 취소되었다는 alert 알림을 하도록 하였다.
- 현재는 가격과 상품명만 수정되었지만, 디테일하게 사용하려면 pay() 함수에 있는 변수들을 일일이 정해줘야한다.
<!DOCTYPE html>
<html layout:decorate="~{/layout/layout}">
<section layout:fragment="content" class="flex-1 flex justify-center items-center">
    <div class="container">
        <div class="card">
            <div class="card-header">
                <h1>수강신청 상세페이지</h1>
            </div>
            <ul class="list-group list-group-flush gap-2 ml-3">
                <li class="list-group-item">
                    <img class="w-full max-w-[300px]" th:src="@{|/gen/${product.thumbnailImg}|}" alt="상품이미지">
                </li>
                <li class="list-group-item">
                    <span>번호 : </span>
                    <span class="badge bg-primary" th:text="${product.id}"></span>
                </li>
                <li class="list-group-item">
                    <span>상품명 : </span>
                    <span class="font-bold" th:text="${product.title}"></span>
                </li>
                <li class="list-group-item">
                    <span>가격 : </span>
                    <span th:text="${#numbers.formatDecimal(product.price, 1, 'COMMA', 0, 'POINT')}+원"></span>
                </li>
            </ul>
        </div>
        <button onclick="pay();" class="btn btn-outline-dark mt-[10px] px-[20px]">결제하기</button>
    </div>
    <script src="https://js.tosspayments.com/v1"></script>
    <script th:inline="javascript">
        let amount = /*[[ ${product.price} ]]*/;
        let orderName = /*[[ ${product.title} ]]*/;
        let tossPayments = TossPayments("test_ck_oEjb0gm23PNbdeJEaxxxxxxxxxxxx"); // 테스트 클라이언트 키

        let path = "/order/";
        let successUrl = window.location.origin + path + "success";
        let failUrl = window.location.origin + path + "fail";
        let callbackUrl = window.location.origin + path + "va_callback";
        let orderId = new Date().getTime();

        function pay() {
            const method = "카드";
            const requestJson = {
                amount: amount,
                orderId: "sample-" + orderId,
                orderName: orderName,
                successUrl: successUrl,
                failUrl: failUrl,
                cardCompany: null,
                cardInstallmentPlan: null,
                maxCardInstallmentPlan: null,
                useCardPoint: false,
                customerName: "박토스",
                customerEmail: null,
                customerMobilePhone: null,
                taxFreeAmount: null,
                useInternationalCardOnly: false,
                flowMode: "DEFAULT",
                discountCode: null,
                appScheme: null,
            }

            console.log(requestJson);
            tossPayments.requestPayment(method, requestJson).catch(function (error) {
                if (error.code === "USER_CANCEL") {
                    alert("결제가 취소되었습니다.");
                } else {
                    alert(error.message);
                }
            });

            tossPayments.requestPayment(method, requestJson)
        }
    </script>
</section>
</html>
- 템플릿 쪽의 샘플코드를 가져왔다면, 이번에는 컨트롤러 쪽의 샘플코드를 가져와 수정해봅시다.
- 아래 코드는 OrderController.java 클래스에 작성된 토스페이먼츠의 샘플 코드이다.
- success와 fail로 매핑된 paymentResult() 메서드에 작성된 @RequestParam 변수는 모두 order/detail.html의 script에 작성된 변수들이다.
- 코드를 보면 알 수 있듯이, 토스페이먼츠에서 제공하는 결제 타입은 카드, 가상계좌, 계좌이체, 휴대폰 등 여러가지가 있다.
package com.cod.market.order.controller;

import com.cod.market.order.service.OrderService;
import com.cod.market.product.entity.Product;
import com.cod.market.product.service.ProductService;
import lombok.RequiredArgsConstructor;
import org.json.simple.JSONObject;
import org.json.simple.parser.JSONParser;
import org.springframework.beans.factory.annotation.Value;
import org.springframework.stereotype.Controller;
import org.springframework.ui.Model;
import org.springframework.web.bind.annotation.GetMapping;
import org.springframework.web.bind.annotation.RequestMapping;
import org.springframework.web.bind.annotation.RequestParam;

import java.io.InputStream;
import java.io.InputStreamReader;
import java.io.OutputStream;
import java.io.Reader;
import java.net.HttpURLConnection;
import java.net.URL;
import java.nio.charset.StandardCharsets;
import java.util.Base64;

@Controller
@RequestMapping("/order")
@RequiredArgsConstructor
public class OrderController {
    @Value("${custom.paymentSecretKey}")
    private String paymentSecretKEy;

    private final ProductService productService;
    private final OrderService orderService;

    @GetMapping("/detail")
    public String detail(Model model, @RequestParam(value = "productId", defaultValue = "") Long productId) {
        Product product = productService.getProduct(productId);

        model.addAttribute("product", product);

        return "order/detail";
    }

    @GetMapping("/success")
    public String paymentResult(
            Model model,
            @RequestParam(value = "orderId") String orderId,
            @RequestParam(value = "amount") Integer amount,
            @RequestParam(value = "paymentKey") String paymentKey) throws Exception {

        Base64.Encoder encoder = Base64.getEncoder();
        byte[] encodedBytes = encoder.encode(paymentSecretKEy.getBytes("UTF-8"));
        String authorizations = "Basic " + new String(encodedBytes, 0, encodedBytes.length);

        URL url = new URL("https://api.tosspayments.com/v1/payments/" + paymentKey);

        HttpURLConnection connection = (HttpURLConnection) url.openConnection();
        connection.setRequestProperty("Authorization", authorizations);
        connection.setRequestProperty("Content-Type", "application/json");
        connection.setRequestMethod("POST");
        connection.setDoOutput(true);
        JSONObject obj = new JSONObject();
        obj.put("orderId", orderId);
        obj.put("amount", amount);

        OutputStream outputStream = connection.getOutputStream();
        outputStream.write(obj.toString().getBytes("UTF-8"));

        int code = connection.getResponseCode();
        boolean isSuccess = code == 200 ? true : false;
        model.addAttribute("isSuccess", isSuccess);

        InputStream responseStream = isSuccess ? connection.getInputStream() : connection.getErrorStream();

        Reader reader = new InputStreamReader(responseStream, StandardCharsets.UTF_8);
        JSONParser parser = new JSONParser();
        JSONObject jsonObject = (JSONObject) parser.parse(reader);
        responseStream.close();
        model.addAttribute("responseStr", jsonObject.toJSONString());
        System.out.println(jsonObject.toJSONString());

        model.addAttribute("method", (String) jsonObject.get("method"));
        model.addAttribute("orderName", (String) jsonObject.get("orderName"));

        if (((String) jsonObject.get("method")) != null) {
            if (((String) jsonObject.get("method")).equals("카드")) {
                model.addAttribute("cardNumber", (String) ((JSONObject) jsonObject.get("card")).get("number"));
            } else if (((String) jsonObject.get("method")).equals("가상계좌")) {
                model.addAttribute("accountNumber", (String) ((JSONObject) jsonObject.get("virtualAccount")).get("accountNumber"));
            } else if (((String) jsonObject.get("method")).equals("계좌이체")) {
                model.addAttribute("bank", (String) ((JSONObject) jsonObject.get("transfer")).get("bank"));
            } else if (((String) jsonObject.get("method")).equals("휴대폰")) {
                model.addAttribute("customerMobilePhone", (String) ((JSONObject) jsonObject.get("mobilePhone")).get("customerMobilePhone"));
            }
        } else {
            model.addAttribute("code", (String) jsonObject.get("code"));
            model.addAttribute("message", (String) jsonObject.get("message"));
        }

//        orderService.save(order);

        return "order/success";
    }

    @GetMapping("/fail")
    public String paymentResult(
            Model model,
            @RequestParam(value = "message") String message,
            @RequestParam(value = "code") Integer code
    ) throws Exception {

        model.addAttribute("code", code);
        model.addAttribute("message", message);

        return "order/fail";
    }

}
[결제 연동 성공 예시]
- 위처럼 프론트엔드와 백엔드 모두 코드를 적용하여 프로젝트에 맞게 수정하면 아래와 같이 결제 시스템이 연동되는 것을 확인할 수 있다.

반응형
'Java > SpringBoot' 카테고리의 다른 글
| [SpringBoot] 실전 서비스 배포 (2) (2) | 2024.07.24 |
|---|---|
| [SpringBoot] 실전 서비스 배포 (1) (2) | 2024.07.24 |
| [SpringBoot] 멀티 채팅방 (3) (0) | 2024.06.19 |
| [SpringBoot] 멀티 채팅방 (2) (0) | 2024.06.19 |
| [SpringBoot] 멀티 채팅방 (1) (2) | 2024.06.19 |


